Machine Learning - Convolutional Neural Networks
Select the URL below for more details https://jorgebartra1.github.io/Machine-Learning/
[![NPM Version][npm-image]][npm-url] [![Build Status][travis-image]][travis-url] [![Downloads Stats][npm-downloads]][npm-url]
Project Overview
Welcome to the Convolutional Neural Networks (CNN) project in the Machine Learning Engineer Nanodegree! In this project, you will learn how to build a pipeline that can be used within a web or mobile app to process real-world, user-supplied images. Given an image of a dog, your algorithm will identify an estimate of the canine’s breed. If supplied an image of a human, the code will identify the resembling dog breed.
This page is a guide to developers who want to use ANACONDA to perform Machine Learning Models with CNN on their local computers .

Development setup
Windows:
Install Anaconda - Python 2.7
https://www.anaconda.com/download/
Create a new environment with Python 2.7
conda create -n myenv python=2.7
Install Theano
conda install theano
Install Tensorflow
conda install tensorflow
Install Keras
conda install keras
Install OpenCV3 package
conda install -c conda-forge opencv
Install PILLOW package (PIL does not work with OPENCV3)
conda install pillow
tqdm Package
conda install -c conda-forge tqdm
Install Scikit-Learn Package
conda install -c anaconda scikit-learn
Install Matplotlib Package
conda install -c conda-forge matplotlib
Usage example
Find if the image used in the model belongs to a HUMAN person. If the image is a human then find the face(s), eyes and smile. See the screen shot results and code below:
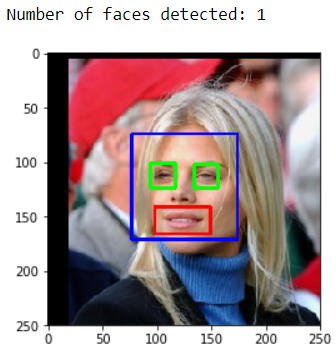
## face detection algorithm on the LFW dataset
import cv2
import matplotlib.pyplot as plt
%matplotlib inline

# extract pre-trained face detector
face_cascade = cv2.CascadeClassifier('haarcascades/haarcascade_frontalface_alt.xml')
eye_cascade = cv2.CascadeClassifier('haarcascades/haarcascade_eye.xml')
smile_cascade = cv2.CascadeClassifier('haarcascades/haarcascade_smile.xml')

#print (human_files[10])

# load color (BGR) image
img = cv2.imread(human_files[11])


# convert BGR image to grayscale
gray = cv2.cvtColor(img, cv2.COLOR_BGR2GRAY)


# find faces in image
faces = face_cascade.detectMultiScale(gray,1.04, 3)

# print number of faces detected in the image
print('Number of faces detected:', len(faces))

# get bounding box for each detected face
for (x,y,w,h) in faces:
    # add bounding box to color image
    cv2.rectangle(img,(x,y),(x+w,y+h),(255,0,0),2)
    roi_gray = gray[y:y+h, x:x+w]
    roi_color = img[y:y+h, x:x+w]
    eyes = eye_cascade.detectMultiScale(roi_gray)
    #for (ex,ey,ew,eh) in eyes:
    for (ex,ey,ew,eh) in eyes:
        cv2.rectangle(roi_color,(ex,ey),(ex+ew,ey+eh),(0,255,0),2)
        smiles = smile_cascade.detectMultiScale(roi_gray)
        for (x2, y2, w2, h2) in smiles:
            cv2.rectangle(roi_color, (x2, y2), (x2+w2, y2+h2), (0, 0, 255), 2)

# convert BGR image to RGB for plotting
cv_rgb = cv2.cvtColor(img, cv2.COLOR_BGR2RGB)

# display the image, along with bounding box
plt.imshow(cv_rgb)
plt.show()
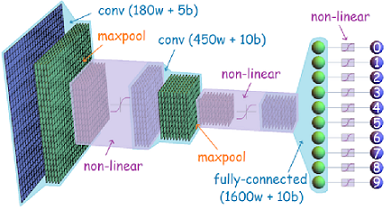
Model Architecture Example
The below is just a sample model architecture
Architecture used in the model:
from keras.layers import Conv2D, MaxPooling2D, GlobalAveragePooling2D
from keras.layers import Dropout, Flatten, Dense
from keras.models import Sequential

model = Sequential()
model.add(Conv2D(filters =20, kernel_size = (7,7), strides = (2,2), padding = 'valid', activation='relu', input_shape=(image_W, image_H, 3)))#train_tensors[0].shape))
model.add(MaxPooling2D(pool_size=(2, 2), strides=(2,2), padding='valid'))
model.add(Conv2D(filters =40, kernel_size = (7,7), strides = (4,4), padding = 'valid', activation='relu'))
model.add(MaxPooling2D(pool_size=(2, 2),  strides=(4,4), padding='valid'))
model.add(Conv2D(filters =80, kernel_size = (3,3), strides = (4,4), padding = 'valid', activation='relu'))
model.add(GlobalAveragePooling2D())
#model.add(Flatten())
model.add(Dense(100, activation='relu'))
model.add(Dropout(0.2))
model.add(Dense(leght_kbreed, activation='softmax'))
model.summary()
Test Accuracy obtained 8.1340 %
Used the code below
test_accuracy = 100*np.sum(np.array(dog_breed_predictions)==np.argmax(test_targets, axis=1))/len(dog_breed_predictions)
print('Test accuracy: %.4f%%' % test_accuracy)
Create a CNN to Classify Dog Breeds (using Transfer Learning)
You will now use transfer learning to create a CNN that can identify dog breed from images.
In this section, you must use the bottleneck features from a different pre-trained model. To make things easier for you, we have pre-computed the features for all of the networks that are currently available in Keras:
VGG-19 bottleneck features ResNet-50 bottleneck features Inception bottleneck features Xception bottleneck features
I used ResNet-50
See the code below
import numpy as np
from keras.optimizers import Adam, Adamax
from keras import regularizers
bottleneck_features = np.load('bottleneck_features/DogResnet50Data.npz')
train_DogResnet50 = bottleneck_features['train']
valid_DogResnet50 = bottleneck_features['valid']
test_DogResnet50 = bottleneck_features['test']
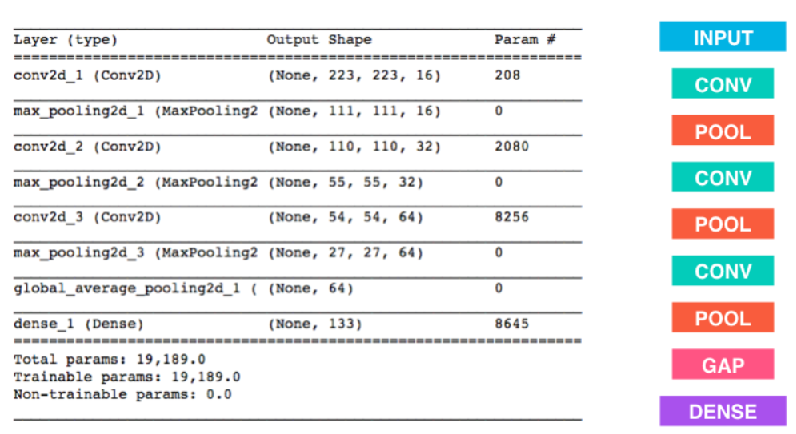
Model Architecture
Resnet_model = Sequential()
Resnet_model.add(GlobalAveragePooling2D(input_shape=train_DogResnet50.shape[1:]))
Resnet_model.add(Dense(150, activation='relu', kernel_regularizer=regularizers.l2(0.01)))
Resnet_model.add(Dropout(0.2))
Resnet_model.add(Dense(133, activation='softmax'))
Resnet_model.summary()
Training the Model
checkpointer = ModelCheckpoint(filepath='saved_models/weights.best.ResNet50.hdf5',
                               verbose=1, save_best_only=True)

Resnet_model.fit(train_DogResnet50, train_targets,
          validation_data=(valid_DogResnet50, valid_targets),
          epochs=26, batch_size=30, callbacks=[checkpointer], verbose=1)
Test Accuracy obtained 83.3732 %
Use the code below
test_accuracy = 100*np.sum(np.array(Resnet50_predictions)==np.argmax(test_targets, axis=1))/len(Resnet50_predictions)
print('Test accuracy: %.4f%%' % test_accuracy)
Below are some samples of the results obtained using Pre-Trained Images given by UDACITY
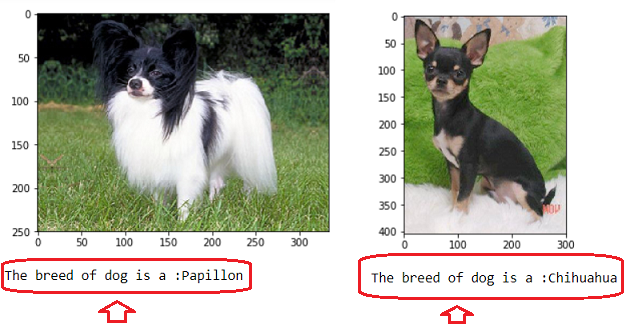
Below are some samples of the results obtained using my own image library

The code used is given below:
from extract_bottleneck_features import *

def checkingDogBreed(img_path):
    # extract bottleneck features
    bottleneck_feature = extract_Resnet50(path_to_tensor(img_path))

    #predicted_vector = Resnet50_model.predict(bottleneck_feature)
    predicted_vector = Resnet_model.predict(bottleneck_feature)
    return dog_names[np.argmax(predicted_vector)]

def predictDogBreed(img_path):
    breed = checkingDogBreed(img_path)

    # Display faces
    img = cv2.imread(img_path)
    cv_rgb = cv2.cvtColor(img, cv2.COLOR_BGR2RGB)
    plt.imshow(cv_rgb)
    plt.show()

    # Checking for the breed
    br = str(breed)
    name = br[br.find('.')+1:]

    if dog_detector(img_path):
        print("The breed of dog is a: " + name )
    elif face_detector(img_path):
        print("Human face detected, but it looks like a: " + name)
    else:
        print("Model unable to detect a human neither a dog!")

Picking Random
predictDogBreed(valid_files[0])
Loading my own images and runing the model
local_files = np.array(glob("images/OwnImages/*"))
print(local_files)

for path in local_files:
    predictDogBreed(path)